Reverse engineering 3D Movie Maker - Part 4
A while ago, I started reverse engineering Microsoft 3D Movie Maker to understand how it works and to develop my game reversing skills. This blog series is about my adventures in reversing 3D Movie Maker and some of the interesting things I learnt along the way.
Previously, on “Reverse engineering 3D Movie Maker”:
- I recovered the C++ class hierarchy by reversing the custom runtime type identification system and wrote a Ghidra script to automate the process.
- I reverse engineered the message handling system and found an Easter egg that had gone unnoticed for about 20 years.
- I reverse engineered the scripting engine and wrote my own disassembler to disassemble the scripts that drive the user interface.
Assembling new scripts
Now that I could disassemble the scripts that controlled the user interface, the next logical thing was to try and assemble my own scripts. In theory this should be pretty simple: take a set of instructions, pack them into the right binary format, patch the assembled script into the app’s data file, and then run the app to check that it worked. Of course, it wasn’t quite that easy.
One of the challenges was figuring out where to put the script. You can’t just add a script and expect the app engine to call it - I first had to figure out which scripts are executed in the UI. I used WinDbg to put a breakpoint on the function that loads a script and dumped out the chunk tag/number of the requested script. By clicking around the UI and observing the WinDbg output I was able to correlate buttons in the user interface with scripts that were executed. I also captured the stack trace of each time a script was executed to find how the engine was deciding which script to execute. From looking at stack traces I found multiple paths between clicking buttons and executing scripts: for example, the help system (TXHG class) will call a script when menu items are clicked, and graphical objects (GOK class) have a map between message IDs and scripts. This is further complicated by scripts that call other scripts.
I decided that I would try and replace the script that handles clicking on the “Go to Imaginopolis” item in the app’s main menu. Clicking this item usually plays a series of cutscenes that leads you to the entrance of the movie theatre. From WinDbg I found that if I clicked any item in the menu, a script would run that then calls another script depending on which button was clicked. These scripts are located in the BUILDING.CHK file. In theory all I would need to do is swap the script chunk that executes when the item was clicked with my custom script to run my own code.
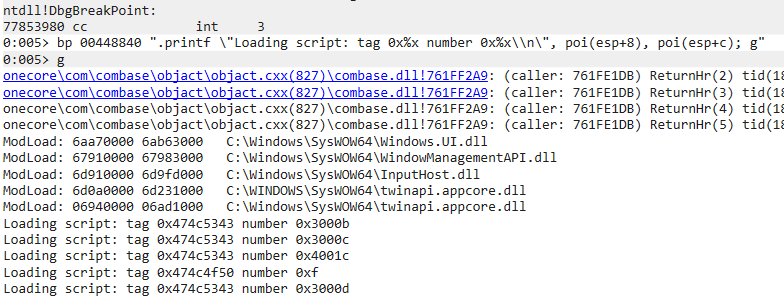
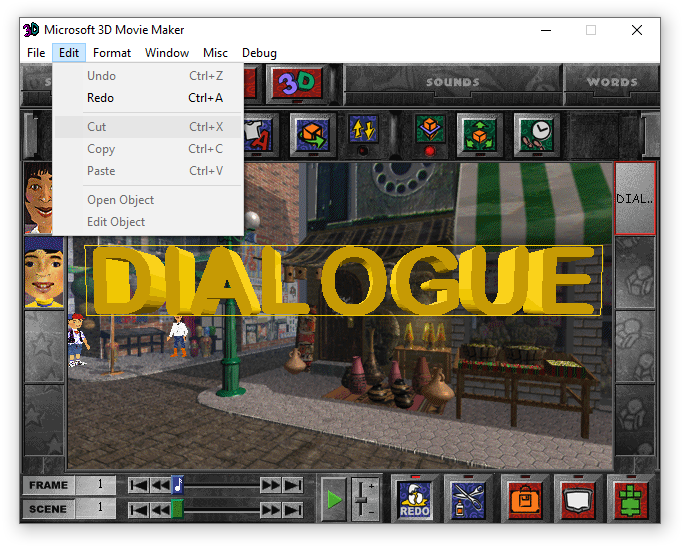
Using a WinDbg breakpoint to dump scripts as they are loaded
The next question was, what should my new script do? Going through the opcode list I found an opcode called “AlertStr” which will pop up a message box containing a string. The AlertStr opcode takes at least two parameters: a string ID for the message format string and the count of the format string parameters, followed by any extra parameters for the format string. The script would look something like this:
push <string-id-of-hello-world-message>
push 1
AlertStr
Assembling the script into the bytecode format was pretty simple. The push instructions turn into a single no-op instruction followed by two stack parameters. Each instruction is encoded as an opcode, a variable name (if a variable is used in the instruction), followed by integer values that are pushed to the stack after the instruction executes.
The only problem was getting my string into the script. Each script object has a pointer to a string table object (STRG class). The string opcodes didn’t provide any way to create a new string - you could copy strings, delete strings, convert numbers to strings, join strings, but not create entirely new strings. The string opcodes would also check to ensure that the script object has initialised the string table and will error out if it hasn’t been initialised. So, first I needed to figure out how this string table was getting initialised.
I followed cross-references through the binary to find where script objects are initialised. The chunky file manager (CRM class) is responsible for loading data from the app’s chunky (data) files. It manages a set of chunky file objects (CFL class) that store app data. When you want to load an object, you give the CRM class a chunk type tag, chunk number, and a callback function that is responsible for deserializing the object from the raw chunk data. These callbacks are useful for mapping fields in a class to the raw data that is on disk.

Ghidra decompilation of loading a chunk with a callback to create a new script object
I found the callback that loads script objects by following cross-references to the SCPT class vtable. The script loading callback also checks if the loaded script has a reference to a GSTX chunk. The GST class is the app’s string table class. If the script chunk has a reference to a GSTX chunk it will load the strings from the chunk and add them to the script. It looked like this was the way to get my string into the script object so it could use it.
From here, all I needed to do to get my custom message box script to work was:
- Assemble my script to create the GLSC chunk
- Generate a string table (GSTX) chunk
- Replace the GLSC chunk in BUILDING.CHK for the menu item I wanted to change
- Add the string table chunk
- Update the GLSC chunk to reference the GSTX chunk
- Repack the BUILDING.CHK file
- Replace BUILDING.CHK in my install with my new patched copy
So I did all of this, started up 3DMM, clicked the “Go to Imaginopolis” item in the menu and … nothing happened. Some further debugging found that when the script engine creates the string table, it sets the highest bit in the index for each item. I updated my script to set the high bit on the string table index and tried it again, and sure enough the message box popped up!
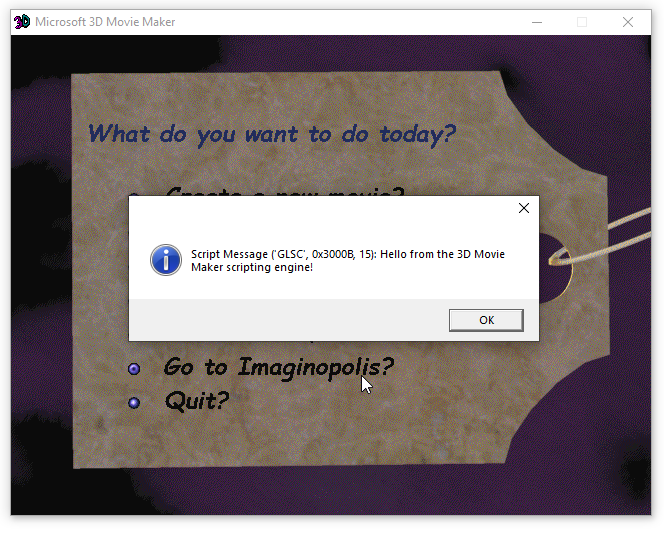
Popping a message box from the scripting engine
Building a toolchain
For my initial testing, I built my script chunks by hand using a hex editor and patched them into the data files using 3DMM Pencil. Hand-crafting scripts with a hex editor isn’t much fun, so I wrote my own assembler to generate them instead. I have integrated the assembler into my Pymaginopolis suite of tools for reverse engineering 3DMM and Creative Writer 2 (CW2).
The Pymaginopolis assembler will parse a script text file and generate the GLSC/GLOP chunks as well as string table chunks if required. The output is an XML file containing the chunk metadata and the assembled scripts/string tables. To patch the assembled scripts into the app’s chunky file you can use the Pymaginopolis xml2chk tool. This works like a linker: you provide a base chunky file and one or more XML files specifying chunks, and it will combine all of the chunks into one file.
The assembler includes an example script that will pop a message box when clicking on the “Go to Imaginopolis” item in the main menu. I also wrote a makefile for use with nmake that automates running the assembler and linking the script into a chunky file. This makes the toolchain feel more like a real software development environment and less like a bunch of hacky Python scripts.
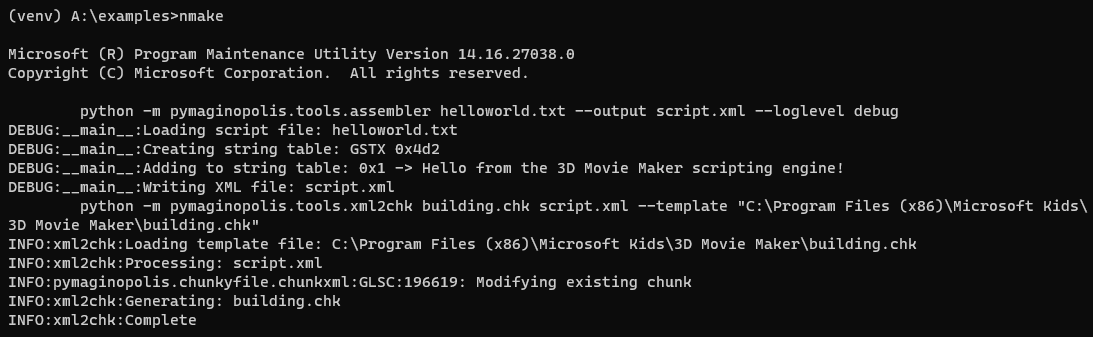
Running the script assembler with nmake
The toolchain is a pretty basic proof-of-concept at this stage, but provides enough functionality to change the behaviour of user interface elements in the app. This opens up some interesting possibilities for 3DMM mods: want to change what those buttons do? Now you can! Want to add a new button? That’s more difficult, as there is still some reverse engineering required to understand the structure of the chunks used to create new graphical objects. But, it is theoretically possible to replace the user interface of 3DMM with your own custom UI, or even write your own app on top of the same engine.
Enabling disabled features
Unfortunately I haven’t yet done anything really cool with my script assembler (other than pop message boxes) so I thought I’d talk about some other random stuff I have found in the 3DMM executable. It turns out that the app engine has some features that aren’t used in 3DMM. One of these features is dropdown menu support.
From looking at the import table of the binary I found that there were calls to functions in USER32.dll that handled menus, eg. GetMenuItemID and GetMenuString. I thought this was a bit strange because standard Windows dropdown and context menus aren’t ever used in 3DMM - instead it uses its own custom dropdown menus. I had also found a menu resource in the Creative Writer 2 executable which was strange as it also doesn’t usually show standard Windows menus. I wondered if it was possible to re-enable these menus in CW2, and if the same could be done with 3DMM.
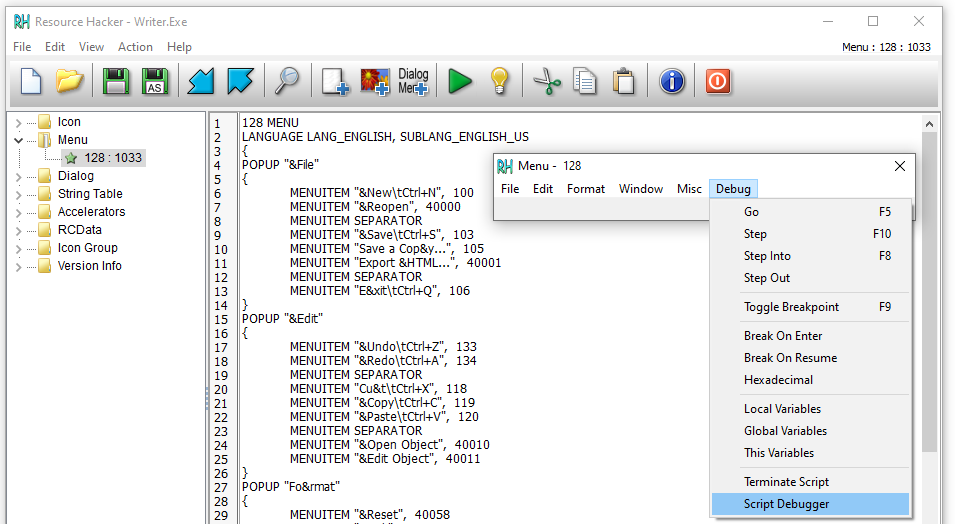
Using Resource Hacker to show the unused menu resource in Creative Writer 2
By following the cross-references to the Windows menu item functions I found the MUB class which manages menu items. The APPB (app base) class loads the menu resource from the executable using the LoadMenu function and then creates a global instance of the MUB class. When a menu item is clicked, the window procedure will call a virtual function on the MUB class which will get the menu item’s ID and send a message with the same ID.
Previously, while reversing the message handling code, I noticed that there was a second callback function pointer in the message handler structure. Most of the message handlers set this to NULL. I had found the code in the message dispatcher class (CEX class) which calls the second message handler, but could not find where it was used or why. Some further digging into the MUB class found a call to the global CEX object that calls this second callback function with the menu item’s ID, then translates the result of the function into a set of flags that are passed to EnableMenuItem. It looks like this is how the menu system determines if a menu item should be enabled or checked. If the message handler does not have a callback, the menu item will default to being disabled.
None of the menu code is actually reachable though. It turns out that the APP class overrides the menu initialisation function in the base class with a function that does nothing.
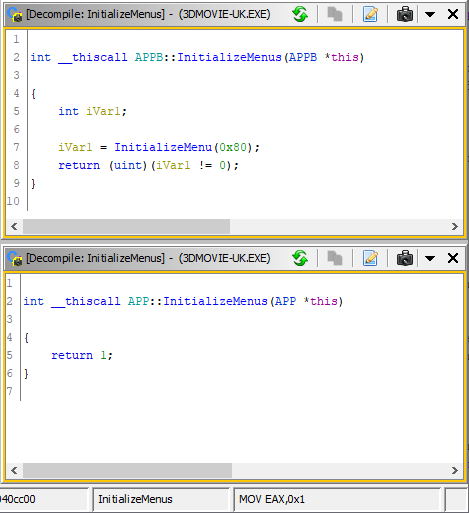
Ghidra displaying the decompiled menu initialisation functions in the APP and APPB classes
So I thought, what if I just patched the vtable in the APP class to use the APPB’s function instead? I decided to try this with CW2 first, given it already had the menu resource in the executable. I used Ghidra to find the vtables for the APPB and the APP class (which for some reason is renamed to SKYA in CW2). I then used WinDbg to patch the vtable with the address of the APPB class’s menu initialisation function. I hit “go” in WinDbg and sure enough the application started with a new menu bar!
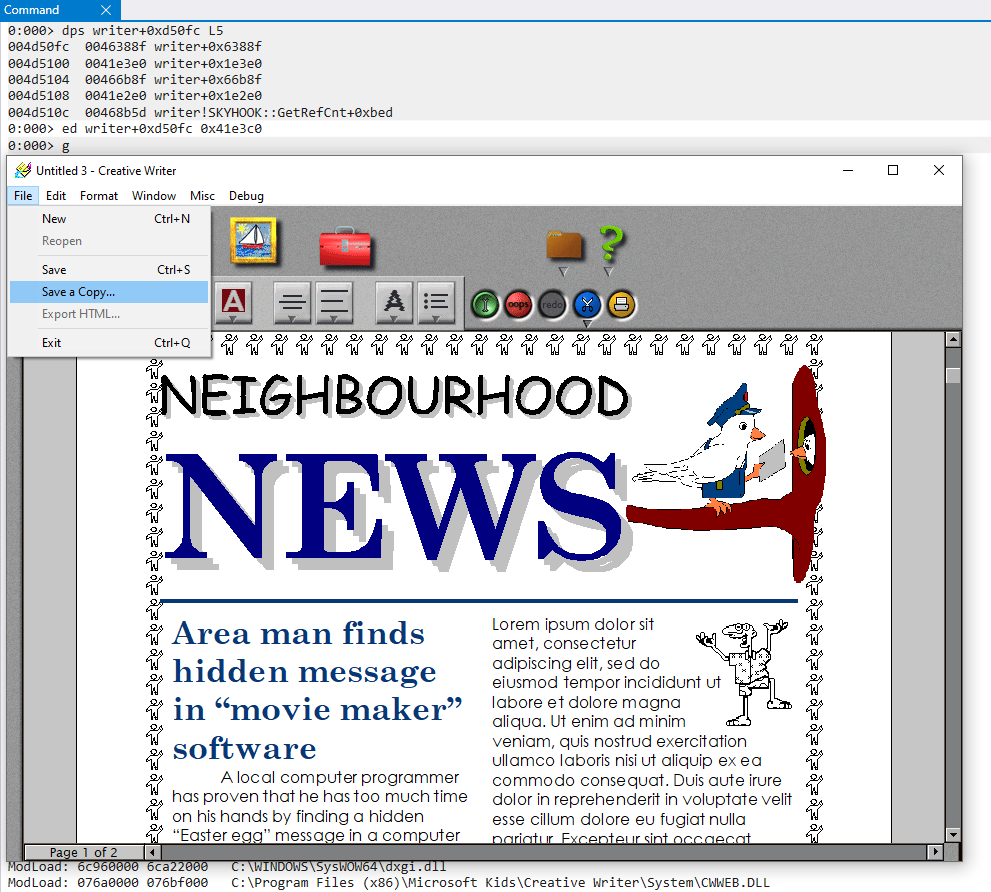
Using WinDbg to patch a vtable in CW2 to re-enable the menu bar
Some of the menu items work as intended - for example, the New item will create a new document, the Save item will save the current document, and Undo and Redo work too. I was really hoping that the Debug menu items worked, but the only item that works is the Breakpoint item, which does exactly what it says on the tin - triggers an interrupt to break into the debugger. That’s unfortunate. But still pretty cool that we can re-enable this functionality so easily.
Of course, I was curious to know if this would work in 3DMM. I made two patches to the 3DMM executable - I changed the APP vtable’s menu initialisation function to point to the APPB implementation, and copied the menu resource from CW2…
3DMM patched to enable the menu bar. The Undo/Redo menu items are synced with the Studio UI.
Surprisingly some of the menu items even work - New, Save, Exit and and Undo/Redo work as long as you are in the Studio. The window size does not account for the new menu bar so the UI is cropped by a few pixels but otherwise works as expected. I’m not sure that hacking menus into 3DMM will add much to the user experience, but I thought it was kinda interesting that all of the code for it is still present in the executable.
Next time: Exploring more undocumented functionality in the app engine.
Also FYI: you can now follow me on Twitter to get notifications of new posts!